
Create a Visual Studio 2017 project template for an advanced console application.
In my daily job I need to create console applications quite often. The default Visual Studio 2017 console application template for .NET Core is very minimal and just contains the usual “Hello World”. But most of the time I need dependency injection, logging, want to have an async main, etc. I also like the structure of ASP.NET Core applications with its Startup class where you can configure your services. Therefor I created my own project template so I do not need to setup all this every time by myself.
Creating the project template
Creating project templates for Visual Studio is quite easy. All you need to do is to create a project as your template, customize the code and project. Then you replace all namespace declarations with namespace $safeprojectname$. This will be replaced by Visual Studio with project name, once you create a project with your template. In my case I create a new Console Application (.NET Core) and added a Startup class where I can configure logging and my services. It also contains an async main which will be the entry method of the console application. I also added a conditional Console.ReadLine so that the program will not be closed when run in debug in Visual Studio.
using Microsoft.Extensions.DependencyInjection;
using Microsoft.Extensions.Logging;
using System;
using System.Threading.Tasks;

namespace $safeprojectname$
{
    public static class Startup
    {
        public static async Task Main(string[] args)
        {
            var program = BuildProgram(args);
            await program.Run();

#if DEBUG
            Console.ReadLine();
#endif
        }

        private static void ConfigureServices(IServiceCollection services)
        {
            services.AddLogging();
            services.AddSingleton<Program>();
        }

        private static void ConfigureLogging(ILoggerFactory loggerFactory)
        {
            loggerFactory.AddConsole();
        }

        private static Program BuildProgram(string[] args)
        {
            var serviceCollection = new ServiceCollection();
            ConfigureServices(serviceCollection);

            var serviceProvider = serviceCollection.BuildServiceProvider(true);

            var loggerFactory = serviceProvider.GetRequiredService<ILoggerFactory>();

            ConfigureLogging(loggerFactory);

            return serviceProvider.GetRequiredService<Program>();
        }
    }
}
In order to get the async main working we need to enable C# 7.1. This can be done in the csproj file by setting the language version.
<Project Sdk="Microsoft.NET.Sdk">
  <PropertyGroup>
    <OutputType>Exe</OutputType>
    <TargetFramework>netcoreapp2.0</TargetFramework>
    <StartupObject></StartupObject>
    <LangVersion>7.1</LangVersion>
  </PropertyGroup>

  <ItemGroup>
    <PackageReference Include="Microsoft.Extensions.DependencyInjection" Version="2.0.0" />
    <PackageReference Include="Microsoft.Extensions.Logging.Abstractions" Version="2.0.0" />
    <PackageReference Include="Microsoft.Extensions.Logging.Console" Version="2.0.0" />
  </ItemGroup>

</Project>
I changed the original Program class to receive a logger and have a run method which will contain the program logic.
using Microsoft.Extensions.Logging;
using System.Threading.Tasks;

namespace $safeprojectname$
{
    public class Program
    {
        private readonly ILogger _logger;

        public Program(ILogger<Program> logger)
        {
            _logger = logger;
        }

        public async Task Run()
        {
            _logger.LogInformation("Hello World");
        }
    }
}
Once we added and changed everything we need for our template, we can now go to Project -> Export Template and use the Export Template Wizard to export the project as a template. Now at the last step, it is very important to disable Automatically import the template into Visual Studio because we need to change the template file, otherwise Visual Studio will not create the Startup and Program class. Once you finished the wizard, Visual Studio will open the folder which contains your template as a zip file. Now unzip the zip file and open the MyTemplate.vstemplate file in an editor and add <CreateInPlace>true</CreateInPlace> to TemplateData. This will fix the issue with not creating the Startup and Program class. The template will now look like this:
<VSTemplate Version="3.0.0" xmlns="http://schemas.microsoft.com/developer/vstemplate/2005" Type="Project">
  <TemplateData>
    <Name>Advanced Console App (.NET Core)</Name>
    <Description>An advanced console application with DI and logging</Description>
    <ProjectType>CSharp</ProjectType>
    <ProjectSubType></ProjectSubType>
    <SortOrder>1</SortOrder>
    <CreateNewFolder>true</CreateNewFolder>
    <DefaultName>ConsoleApp</DefaultName>
    <ProvideDefaultName>true</ProvideDefaultName>
    <LocationField>Enabled</LocationField>
    <EnableLocationBrowseButton>true</EnableLocationBrowseButton>
    <Icon>__TemplateIcon.png</Icon>
    <CreateInPlace>true</CreateInPlace>
  </TemplateData>
  <TemplateContent>
    <Project File="AdvancedConsoleApp.csproj" ReplaceParameters="true">
      <ProjectItem ReplaceParameters="true" TargetFileName="Program.cs" OpenInEditor="true">Program.cs</ProjectItem>
      <ProjectItem ReplaceParameters="true" TargetFileName="Startup.cs">Startup.cs</ProjectItem>
    </Project>
  </TemplateContent>
</VSTemplate>
Now zip all the files and take care that they are at the root level of your zip and not within a folder, so do not zip the folder containing the files but the files it self. Otherwise Visual Studio will not recognize the template.
Installing the template
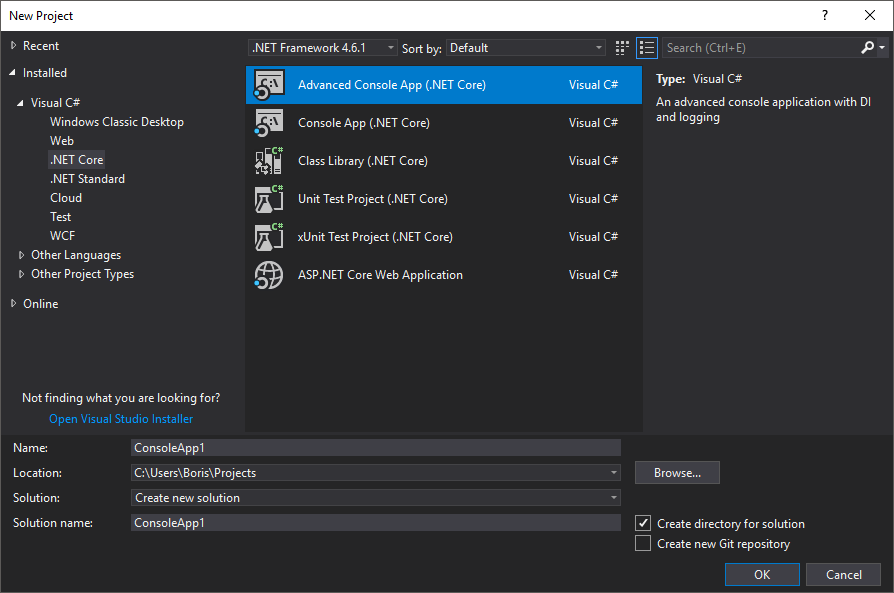
Installing the template is just copying the zip file to the right place. By default user templates are stored in the Visual Studio XXXX folder withing your documents folder. Within the ProjectTemplates folder you can copy the zip file to the appropriate language folder. If you like, you can also create your own folders. This will be reflected in the “New Project” dialog in Visual Studio. I have created a .NET Core folder, since this is a .NET Core template. The final path will be %userprofile%\Documents\Visual Studio 2017\Templates\ProjectTemplates\Visual C#\.NET Core\AdvancedConsoleApp.zip. Once this is all done, you can start Visual Studio and your template should be visible in the “New Project” dialog.
You can find the whole template source and a script for building and installing the template at GitHub.